Halloween marked the one year anniversary of when I started the adventure of moving into my house! I invited friends over for a party the day before but due to a crazy wind and rainstorm I postponed until the following week which provided more accommodating weather for tours and sharing stories and s'mores by a fire :)
Last year, it started raining about two weeks before my move which was not an issue at my build site since I was building on asphalt and transportation was easy on the city streets. The difficult part was getting it into the yard on soft garden ground into it's place. You can read more about all of that here. After four days of moving and settling it on a sound foundation, I moved in!
Within a few weeks, I had a couple of friends in town spend the night so I put up some temporary shelving to get things off of the floor to clear a space for me to sleep while they slept up in my loft. Luckily they are also outdoors people and didn't mind the chaotic accommodations.
Since I had spent all of the money I saved to start the build, I took a little break from projects until January when I installed plumbing and finished out my bathroom. I used the compost toilet I found at the ReStore until I had an overflow issue and then needed to rebuild it. I used some inexpensive cedar fence boards to build a new box but it wasn't all that functional for various reasons so I continued to use the shop bathroom. In the last few weeks I finally rebuilt the toilet to a more functional and aesthetically pleasing design so I am excited to be able to use it now that the rainy season is back.
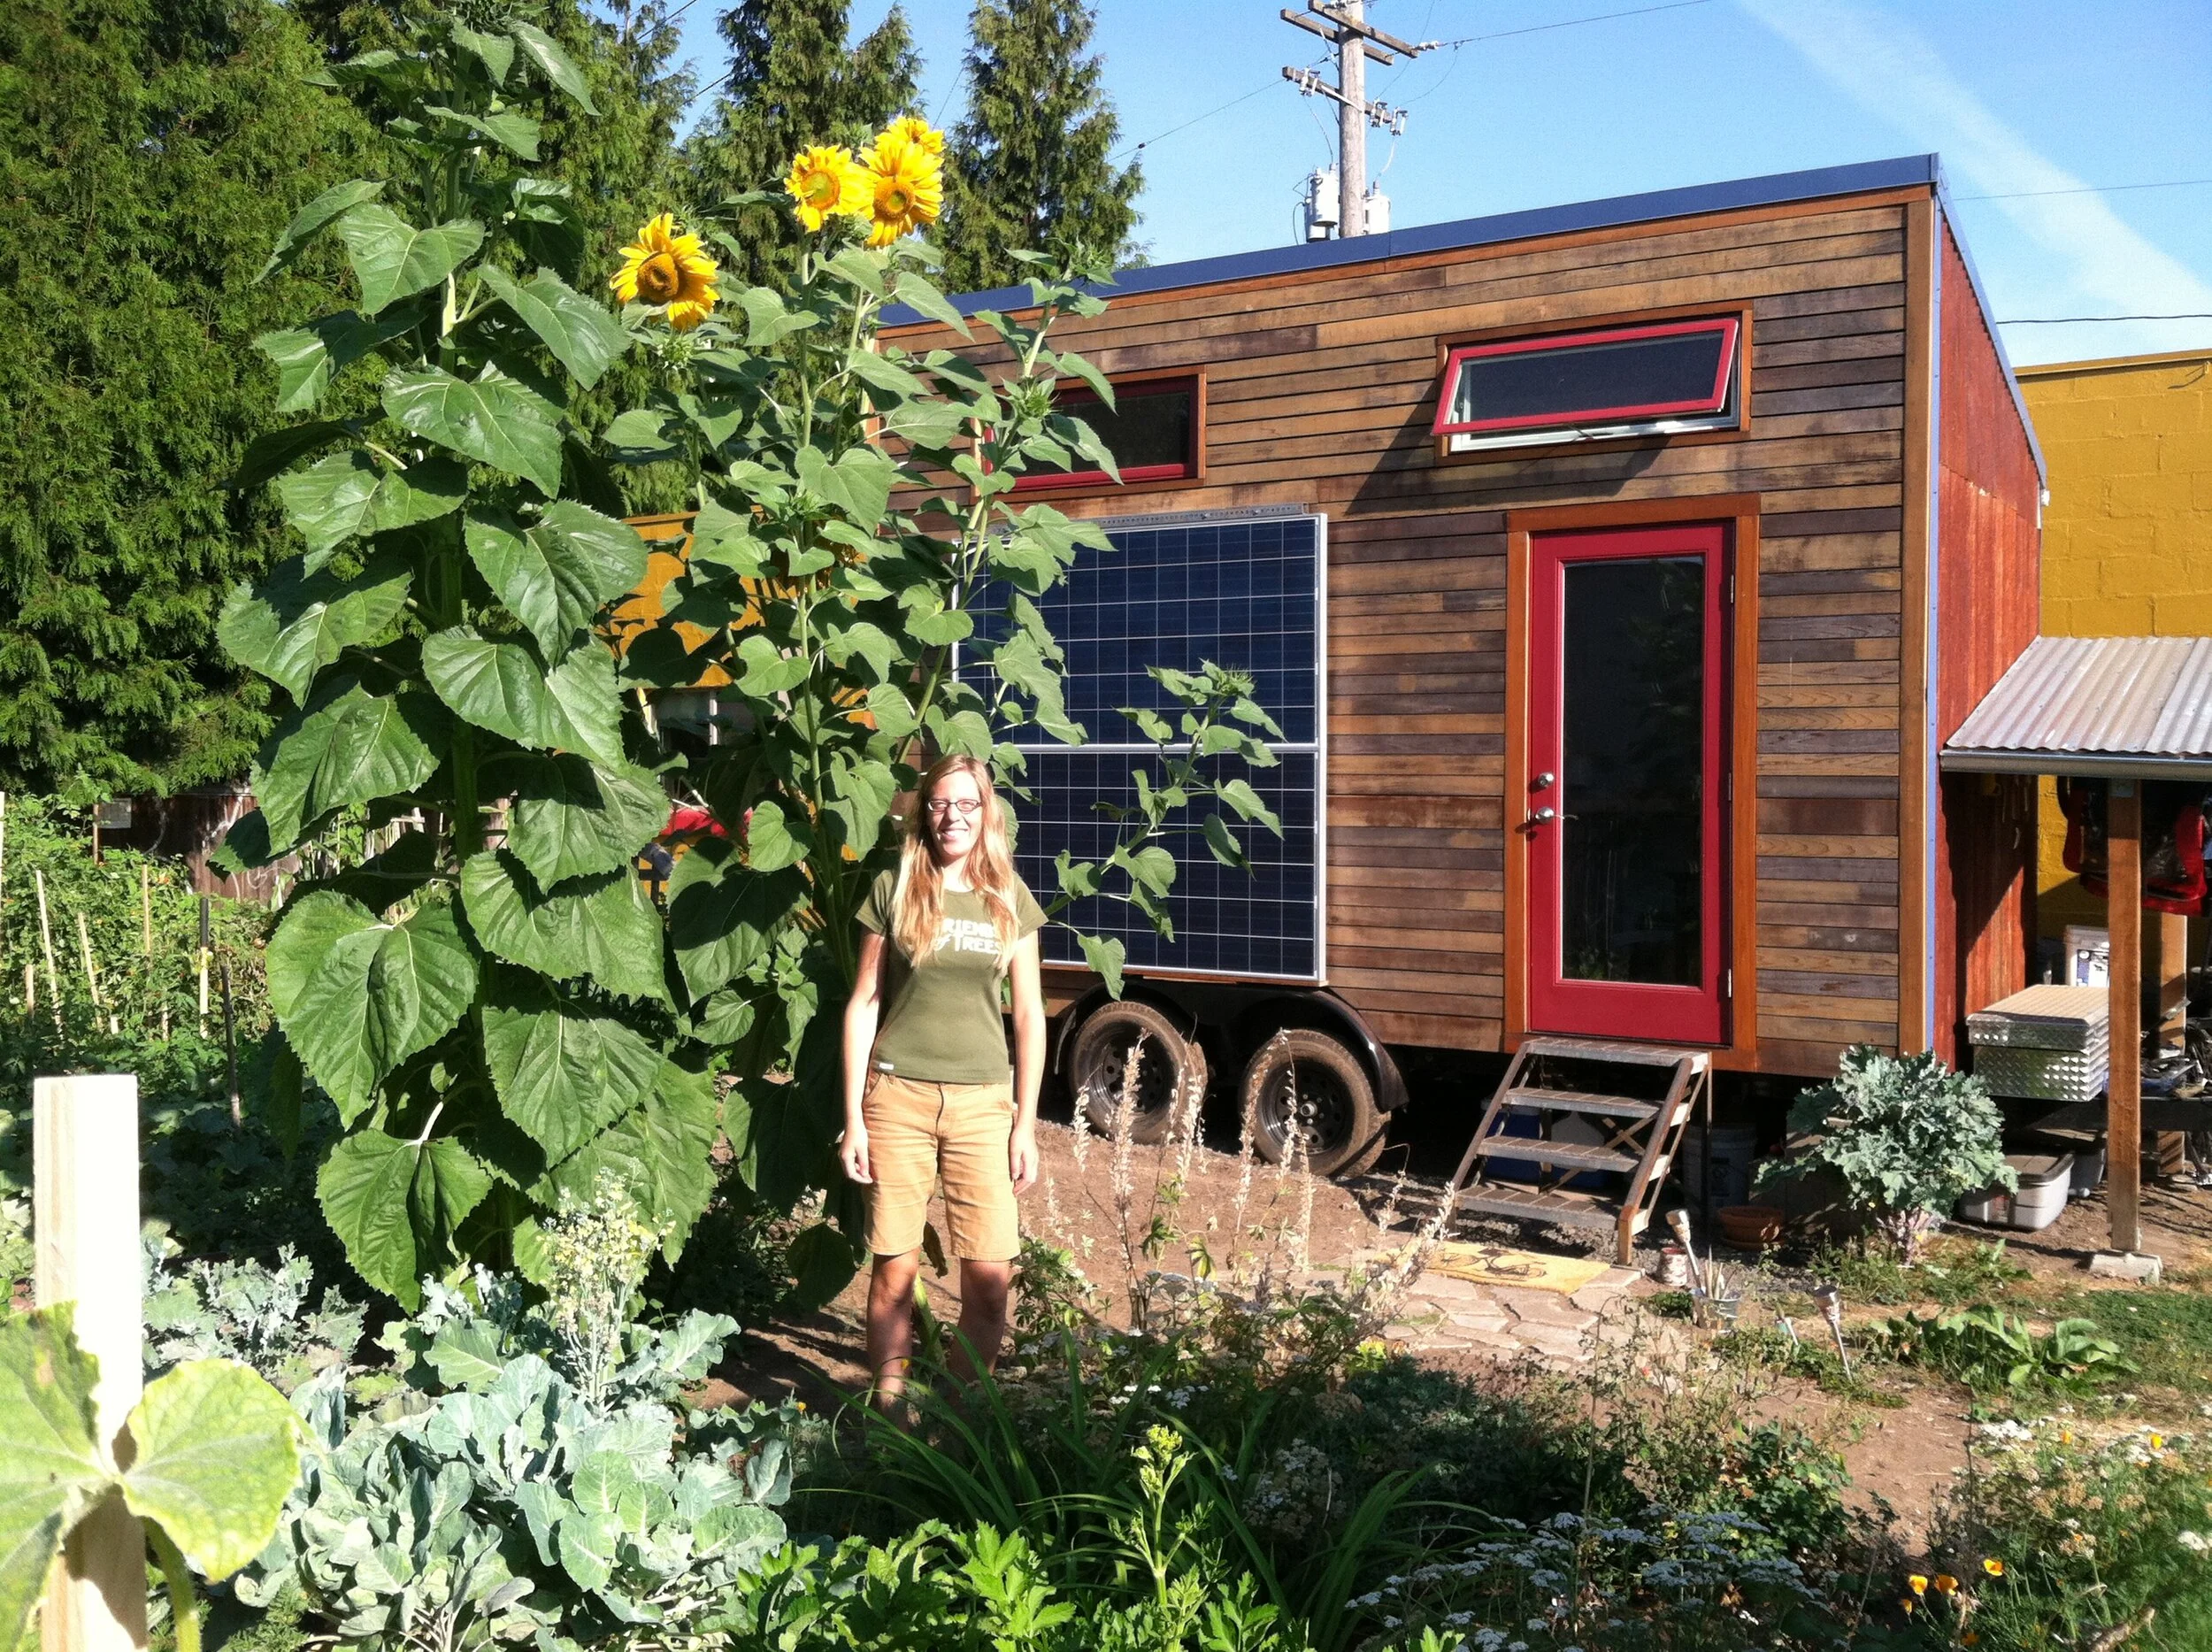
Speaking of rainy season, I am really grateful for the gutters and rain chain I added to help direct rain away from my house, not to mention how cool the recycled glass bottle chain funnels water to the ground. My polycarbonate awning is also welcomed in providing a more sheltered entry to my house. I needed to add some flashing above it to help prevent water from pooling up behind the siding and entering my house through capillary action via my door frame. I also built a covered bike and tool storage area with another shed roof on the trailer tongue. Moving my tools out of my house freed up a good amount of space since about half of my possessions are tools and outdoor gear!
I added rock holds to ease loft access, new "great room" shelving in the form of fruit crates, and a full size digital piano that I hope to loosen up my rusty fingers on more this winter and beyond.
In May we wired up my house for AC power but it wasn't until June that we ran power out to the yard shed where I could finally plug in and turn on my fridge and water heater. In August, I added a small battery based solar system that powers the electronics and lights in my loft and could power my great room light and outlets in the future if I want or need to be off grid. (I would need to swap out the water heater and fridge for RV/boat style propane appliances and figure out my cooking situation if I could cook outside on my RV range or grill year round.)
I learned how to weld in May and built a kitchen cabinet frame which was finished out with drawers and slides in September by a cabinet maker friend who works in the shop next door. I also built a small cabinet with one shelf for the left side of my sink (next to the bathroom wall) to fill in the gap which had been designed for a double basin sink before I found my awesome farm sink!
Outside, it's been a bountiful year in the garden (my first time as the primary gardener for a large space). I grew native wildflowers, strawberries, blueberries, raspberries,pees, green beans, beets, parsnips, carrots, broccoli, Brussels sprouts, kale, chard, cabbage, lettuce, cucumber, tomatoes, basil, corn and squash (so much squash...). Giant sunflower volunteers grew to over 10' tall! And of course there was much watering and weeding...the morning glory, thistles, dandelions, wild peas, wild onions, blackberries and quack grass really wanted to take over the yard but not this year...
I have changed jobs a few times from doing home performance audits, sales and project management to a summer outreach and canvassing position promoting the urban forest and now to solar installs! I continue to volunteer for my favorite non-profits: Friends of Trees, Portland Fruit Tree Project and Community Cycling Center. I also found time to play outside more this year, mainly in the form of hiking. Here's to the next year!
As always, you can check out my fickr for more photos!
This spring, before I started my build, I found a stainless steel double basin sink at the ReBuilding Center for $24. Since many tiny housers start their build with a sink, I figured I may as well too. I had planned to make a cutting board to rest over one of the basins which would also contain the dish rack. That way I would have flexibility in space use since I was not planning to install another sink in the bathroom.
I really wanted to find an old cast iron farm sink with drainboard but had no luck in finding one at the time. So I kept passively looking and then stumbled across one a little over a month ago at BMR just before I was about to check out. It was resting near the front of the store away from the rest of the sinks so it must have just recently arrived. I stopped and stared at it for a minute, thinking "huh, I think this is my sink." At $95 it was more expensive than my other sink but my other sink would have required a butcher block countertop that I had planned to make. With the sink basin on the left side and drainboard on the right side, it fit in with my house design. It even came with a unique wall-mounted faucet (more about that below).
So I decided to buy it. I learned later that several other people had come back to buy it after I did so I felt lucky I chose to make the trip there when I did. (I found two similar sinks the following week but each had a center basin flanked by drainboards). I took it back to site and set it on a folding table in it's eventual place. There is about a 7" gap on the left side between it and the bathroom wall that presents a new design opportunity for some kind of pantry and/or dish storage with shelves/hooks/etc. On the right side, I will build or find a small cabinet with a drawer and shelves for cookware.
But before that, I needed to figure out if the faucet would be usable. (I found the patent number, looked it up and found it was from 1945!) Whoever removed it, cut the copper supply pipes off so short that I was told by most people would render it useless. If I could not use it, I learned that a replacement would be difficult, if not impossible to find due to it's unique quality of the supply coming in through a central hole in the backsplash wall. For some reason, a second hole was cut in the backsplash behind one of the faucet "wings" and no one has had a good explanation of that. I could not find any new faucets with this single hole design, most wall-mounted faucets are now designed with two separate holes 6-8" apart. If I used a new faucet, it would mean that I would have to drill another hole into the porcelain/cast iron backsplash. I did not feel comfortable doing that so I kept asking around at the reuse stores.
Finally, I went to Hippo Hardware which specializes in antique hardware. I figured if anyone could help, it would be them. I talked to a guy in the plumbing section who looked at the faucet, took it apart to check out the condition of the components. He said it was in pretty good condition and could probably work with some new gaskets if I could find someone to braise on new supply pipes. I thought about who I might know and trust to accomplish that task and then asked Kevin on site who had welded my loft joists. He looked at it and told me that if I could get the body separated from the rest, he would try to make it happen.
I had other house projects that were more pressing so I set it aside for the time being. Kevin came by an hour later and said, "Let me see that faucet." I gave it to him and went back to work. A few hours later, I needed to leave and let Kevin know. He went to get the faucet and handed it over to me pipes braised and internal components replaced! I haven't tried it yet since my plumbing isn't in but my fingers are crossed that it will work.
Next, I worked with Rory to design and build some steel sink brackets to cantilever it similar to the loft ladder. I had originally thought I would need a steel cube wireframe structure but Rory reminded me of the strength of steel. Apparently some old cast iron sinks were hung from special brackets but I figured the chances of me finding ones that would match my sink were slim. So he made two really beefy brackets out of 3/8" x 1 1/2" steel. They started out as L's and he thought about adding a small triangle gusset to each but I thought a diagonal support would be better. He thought that piece as an arch would look better so I told him to go for it.
Once Rory cut, drilled and welded the pieces together and I had marked out their locations on the wall (ensuring space for water heater and fridge below), we set one in place to mark the location of the top hole, then removed it and predrilled a hole for a hanger bolt. I installed the hanger bolt, then we put the bracket in place, plumbed it, and added a temporary screw in the bottom hole. Next, we leveled over for the other bracket and repeated the process. Then, we set the sink on top to line up the edges so we could mark where the holes in the sink would need to be drilled into the horizontal section of the brackets. This was a tricky process since we could only do one at a time and space was tight since we had to mark from the top. I tried spraying paint through the hole of the sink onto the bracket but that plan failed since the paint spread beyond the hole opening. I tried drawing a line with a short pencil around the flange of the hole so when we removed the sink, I could more accurately locate the hole with measurements. That worked much better. Once one side was done, we added temporary bolts to secure the sink to the bracket so we could mark the second side. All went well except one of the holes was slightly off but Rory just drilled a larger hole so it was fine.
We took everything apart to Rory could sand and lacquer the brackets and I could add the remaining 4 hanger bolts. Once the brackets were dry, we put it all back together without much difficulty. Now I can start installing the plumbing! For more photos, check out my flickr!


 Last year, it started raining about two weeks before my move which was not an issue at my build site since I was building on asphalt and transportation was easy on the city streets. The difficult part was getting it into the yard on soft garden ground into it's place. You can read more about all of that here. After four days of moving and settling it on a sound foundation, I moved in!
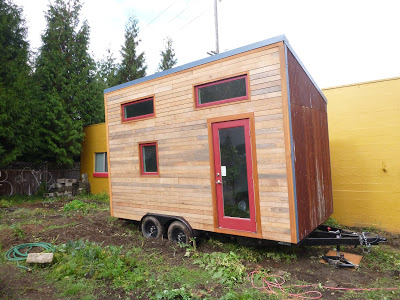 Within a few weeks, I had a couple of friends in town spend the night so I put up some temporary shelving to get things off of the floor to clear a space for me to sleep while they slept up in my loft. Luckily they are also outdoors people and didn't mind the chaotic accommodations.
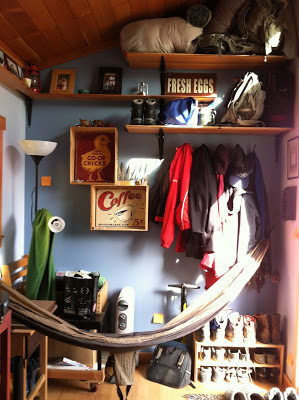 Since I had spent all of the money I saved to start the build, I took a little break from projects until January when I installed plumbing and finished out my bathroom. I used the compost toilet I found at the ReStore until I had an overflow issue and then needed to rebuild it. I used some inexpensive cedar fence boards to build a new box but it wasn't all that functional for various reasons so I continued to use the shop bathroom. In the last few weeks I finally rebuilt the toilet to a more functional and aesthetically pleasing design so I am excited to be able to use it now that the rainy season is back.
 Speaking of rainy season, I am really grateful for the gutters and rain chain I added to help direct rain away from my house, not to mention how cool the recycled glass bottle chain funnels water to the ground. My polycarbonate awning is also welcomed in providing a more sheltered entry to my house. I needed to add some flashing above it to help prevent water from pooling up behind the siding and entering my house through capillary action via my door frame. I also built a covered bike and tool storage area with another shed roof on the trailer tongue. Moving my tools out of my house freed up a good amount of space since about half of my possessions are tools and outdoor gear!
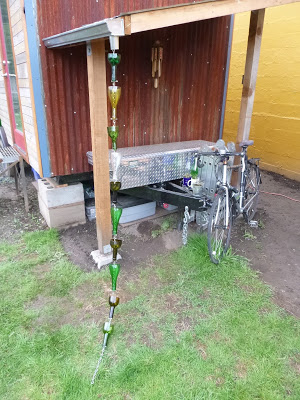 I added rock holds to ease loft access, new "great room" shelving in the form of fruit crates, and a full size digital piano that I hope to loosen up my rusty fingers on more this winter and beyond.
 In May we wired up my house for AC power but it wasn't until June that we ran power out to the yard shed where I could finally plug in and turn on my fridge and water heater. In August, I added a small battery based solar system that powers the electronics and lights in my loft and could power my great room light and outlets in the future if I want or need to be off grid. (I would need to swap out the water heater and fridge for RV/boat style propane appliances and figure out my cooking situation if I could cook outside on my RV range or grill year round.)
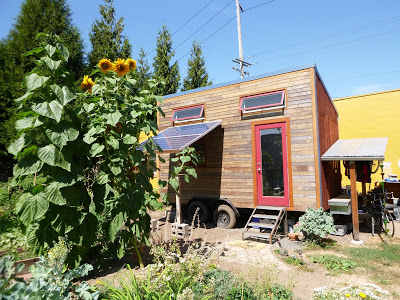 I learned how to weld in May and built a kitchen cabinet frame which was finished out with drawers and slides in September by a cabinet maker friend who works in the shop next door. I also built a small cabinet with one shelf for the left side of my sink (next to the bathroom wall) to fill in the gap which had been designed for a double basin sink before I found my awesome farm sink!
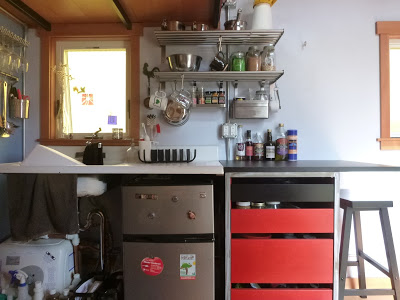 Outside, it's been a bountiful year in the garden (my first time as the primary gardener for a large space). I grew native wildflowers, strawberries, blueberries, raspberries,pees, green beans, beets, parsnips, carrots, broccoli, Brussels sprouts, kale, chard, cabbage, lettuce, cucumber, tomatoes, basil, corn and squash (so much squash...). Giant sunflower volunteers grew to over 10' tall! And of course there was much watering and weeding...the morning glory, thistles, dandelions, wild peas, wild onions, blackberries and quack grass really wanted to take over the yard but not this year...
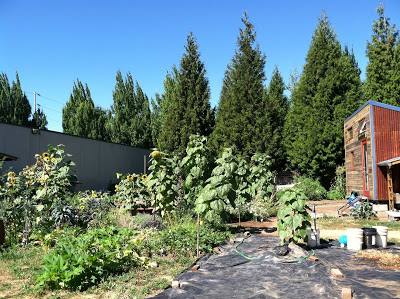 I have changed jobs a few times from doing home performance audits, sales and project management to a summer outreach and canvassing position promoting the urban forest and now to solar installs! I continue to volunteer for my favorite non-profits: Friends of Trees, Portland Fruit Tree Project and Community Cycling Center. I also found time to play outside more this year, mainly in the form of hiking. Here's to the next year!