


One of the things about 100 year old homes is that most things are no longer plumb, level or square (if they even were to begin with in the first place). After readjusting the front door strike plate shortly after moving in so I wouldn't be frustrated with the latching and locking mechanisms every time I moved in and out, I recently decided to fix the side door as well. The owner and contractors working on the house said it was difficult to open and that special tricks including pliers and pulling up on the door were necessary to unlock and open it. Many people assume that old doors just get that way over time and nothing can be done to fix them. But you interact with door hardware every day so why not find a way to improve the functionality?


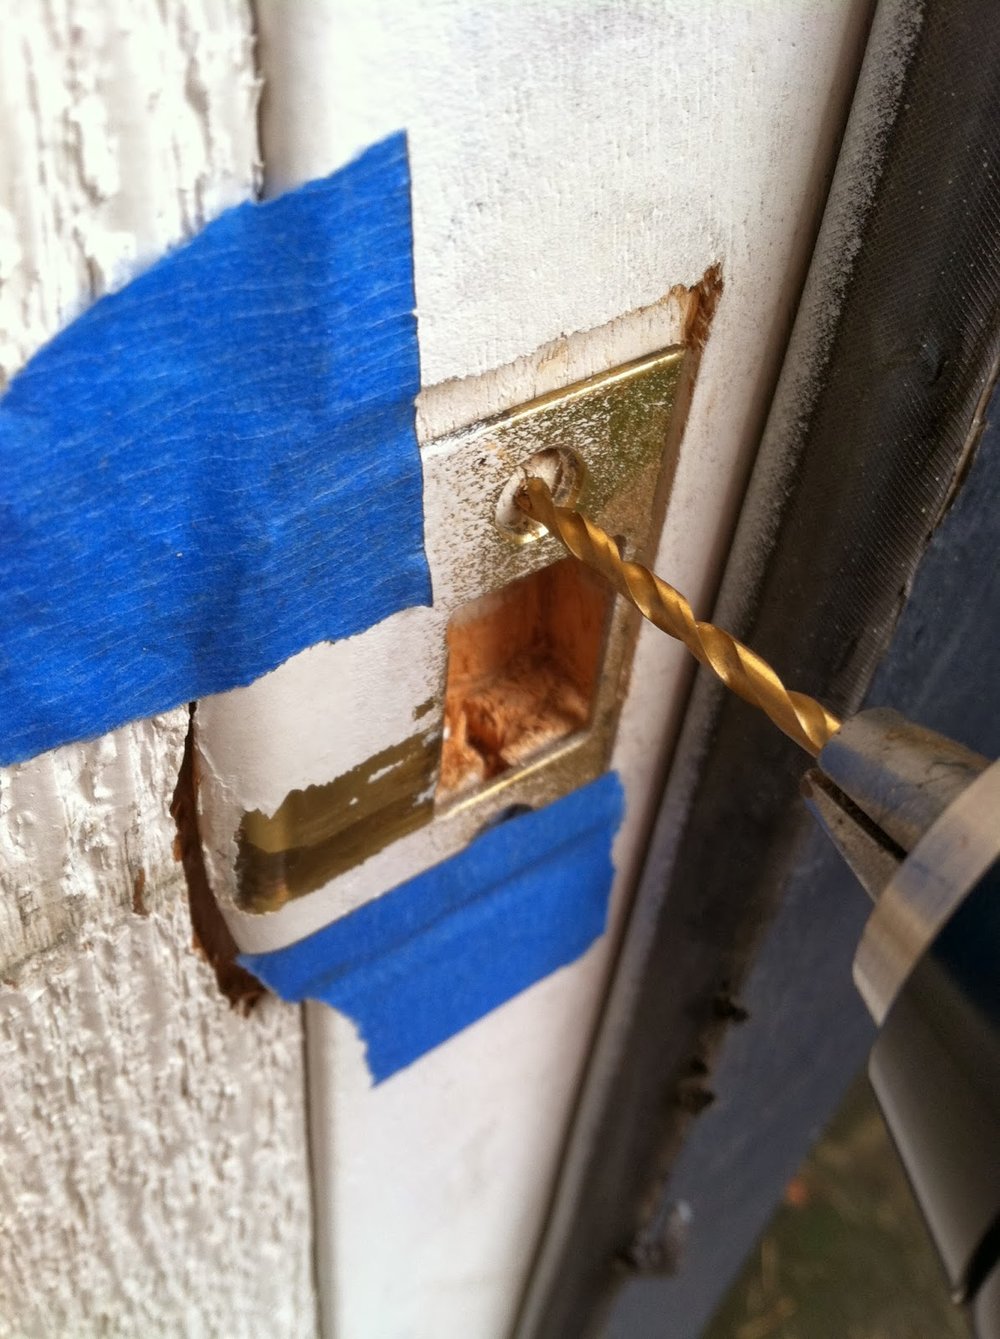
The marks were at the lower edges of the openings in the strike plates which means that they needed to be re-positioned lower. I used my drill to remove the screws from each plate (you can also use a screwdriver) and then set the screws and plates aside while I began chiseling out wood at the bottom of the holes. I also chiseled out the wood the strike plates rest on at the bottom so they would remain flush with the rest of the door jamb. The trick with chisels is that you want to keep them sharp as it is much easier to do clean chiseling that way.


Luckily, the work at a previous job gave me plenty of experience with the quirks of old doors, most of which can be fixed. Sometimes there is a limit to the amount of fixing you can do, like tightening wobbly old door knobs, and you need to choose between living with these imperfections or finding another solution, which may be a new door knob or even a whole new door and jamb.
Many door problems can be fixed by "just" adjusting the strike plates of the latch, deadbolt or both. I say "just" because the solution to every door problem varies in difficulty with some requiring more skill and patience than others. The details and variations of which would lengthen this post greatly so I will just write about the door in my house specifically.
I began by gathering up the tools I would likely need: drill, drill and drive bits, hammer, chisel, tape and pencil. Next, I tried opening and closing and locking the door to gain an understanding of the door in its existing condition. I checked the hinge screws to ensure they were tight. I looked at the strike plates to see if there were any marks where the latch and deadbolt were hitting when the door would close. Sure enough, the marks were visible on both strike plates. I was lucky in this situation since part of the plates had been painted so the marks were obvious. That is not always the case.
The marks were at the lower edges of the openings in the strike plates which means that they needed to be re-positioned lower. I used my drill to remove the screws from each plate (you can also use a screwdriver) and then set the screws and plates aside while I began chiseling out wood at the bottom of the holes. I also chiseled out the wood the strike plates rest on at the bottom so they would remain flush with the rest of the door jamb. The trick with chisels is that you want to keep them sharp as it is much easier to do clean chiseling that way.
Then I temporary positioned the strike plates into their new positions with tape to check their locations before screwing them in place. I tested them by closing the door, making sure the latch and deadbolt easily slid into the holes.
When I got them where I wanted, I pre-drilled holes through the two small holes in each strike plate, making sure that my holes were not as deep as my screw length so the tip of the screws would tie into the wood without spinning. I was again lucky that I had existing wood in the door jamb to drill into for the new holes (sometimes you have to patch a new piece of wood in and then drill new screws into that) and that I could use the existing screws (sometimes you have to find new ones since the old ones may be stripped or too short). I kept the tape in place while doing this which is like having an extra hand.
Then I swapped my drill bit with my Phillips drive bit and drove in the screws. I did a final close and lock check and found success. The door is now much easier to open and close and does not require any special techniques or extra frustrations.
If you are in need of a little door magic, you know who to call!
If you are in need of a little door magic, you know who to call!