
Learning how to weld had been on my "to do" list for some time. I had signed up for an intro class at a community college a few years ago but since I didn't have a specific project in mind or even know just the basics, I was a little bit intimidated in participating in a class which did not really have a structured learning progression, instead more like open shop time. I had my trailer custom built and worked with welders on the structural steel interior components (joists, ladder and sink brackets) during those parts of the build. I wanted to build some more interior components with steel so in May I signed up for some welding classes at ADX, a maker space in Portland.
The first class I attended was an intro to metals class where we learned all about the different tools to cut, bend, grind, sand and weld metal. It was interesting to compare and contrast them to the woodworking tools with which I am familiar. We learned about different types of metals and some of the uses for them. We also were able to get some hands on experience using scrap pieces and most of the tools available. The other two classes I took were intro to MIG and intro to TIG where we focused on welding two pieces of metal together in different ways (butt joints, overlaps, inside and outside corners, etc.). The class sizes are kept small so there is a good student to instructor ratio in order to get quicker feedback and questions answered. I would have liked to learn more about designing and building projects from these classes as well but understood the time constraints and scope of the classes. Maybe in the future, they will offer more advanced or project based classes.
Since my classes came with an unlimited month pass to use the space and tools, I wanted to be able to complete at least one project for my house. I decided that the first project would be welding a frame for my kitchen storage next to the fridge where I am currently using water heater stands as temporary storage shelves. I drew up some sketches of a basic cube frame with horizontal supports for the shelves. I thought about using angle iron to create an L shape perimeter for each shelf so that I could insert a piece of plywood and there would be a lip around the edges to keep items from falling off. I talked this idea over with a woodworker friend and he suggested using 1" tube steel due to its superior rigidity and to support drawer slides so I could have easier access to the items in back of the shelves. Since he said he would be willing to help me with the drawer part, I went ahead and picked up the tube steel from the steel yard and got to work at ADX.
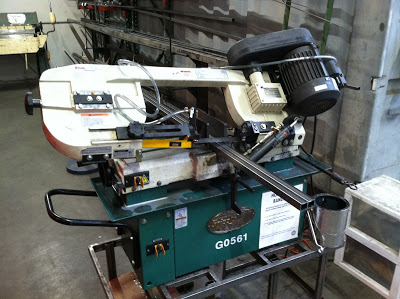 First, I cleaned all of the steel with Simple Green to get rid of the oil and grime. Then, I made a cut list of all the pieces I needed and made the cuts using the horizontal bandsaw which uses a lubricant to help cut through the steel. Once I had finished cutting all of the pieces, I filed the rough edges and then laid out the pieces for one side of the frame. I decided to use the MIG welder for this project since it's faster and easier than the TIG welder even though you don't get as nice of a weld joint but I didn't really care about that for this project.
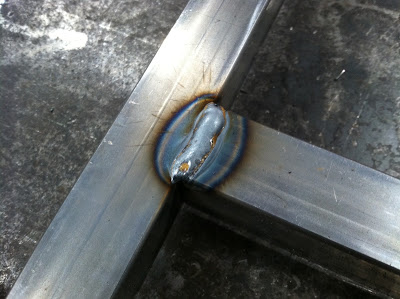 I tack welded each seam on one side, then flipped it over and repeated on the other side since I was trying to minimize deflection. Then, I ran full beads on each seam facing up on each side. Even though I tack welded first, the metal still deflected due to the heat of the weld.
 I decided to use the magnets and clamps for the opposite (mirror) side of the frame to see if I could get better results. I also used extra pieces of the tube steel underneath the parts I welded to help create a more flat plane since the shop table wasn't perfectly flat. I then repeated the welding process from the other side and did experience less deflection of the metal.
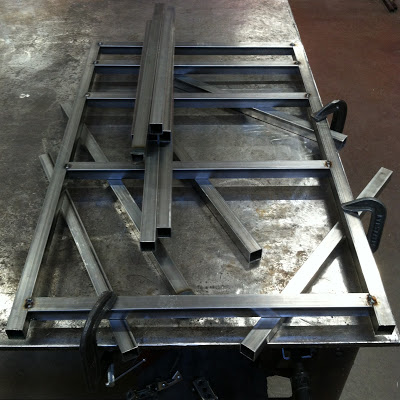
 After I made the two side components, I needed to stand them up and connect the corners with four more pieces. Once again, magnets were my friend. I tacked everything together before running full beads and found that one of the four sides was out of square. Luckily, I was able to borrow a pipe clamp from a friend and use that to pull it into square. I had to keep it in place for the full weld bead since the tacks were not strong enough to hold it there. I finished welding all of the remaining joints and then took it to the grinding room where I used an angle grinder and a flap disk to grind down the welds to create a clean, seamless look.
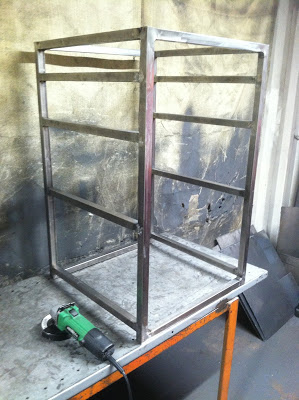
 I definitely have more to learn about welding and more time practicing weld joints but I think it turned out pretty well for my first project! More to come with the sliding drawers...
The first class I attended was an intro to metals class where we learned all about the different tools to cut, bend, grind, sand and weld metal. It was interesting to compare and contrast them to the woodworking tools with which I am familiar. We learned about different types of metals and some of the uses for them. We also were able to get some hands on experience using scrap pieces and most of the tools available. The other two classes I took were intro to MIG and intro to TIG where we focused on welding two pieces of metal together in different ways (butt joints, overlaps, inside and outside corners, etc.). The class sizes are kept small so there is a good student to instructor ratio in order to get quicker feedback and questions answered. I would have liked to learn more about designing and building projects from these classes as well but understood the time constraints and scope of the classes. Maybe in the future, they will offer more advanced or project based classes.
Since my classes came with an unlimited month pass to use the space and tools, I wanted to be able to complete at least one project for my house. I decided that the first project would be welding a frame for my kitchen storage next to the fridge where I am currently using water heater stands as temporary storage shelves. I drew up some sketches of a basic cube frame with horizontal supports for the shelves. I thought about using angle iron to create an L shape perimeter for each shelf so that I could insert a piece of plywood and there would be a lip around the edges to keep items from falling off. I talked this idea over with a woodworker friend and he suggested using 1" tube steel due to its superior rigidity and to support drawer slides so I could have easier access to the items in back of the shelves. Since he said he would be willing to help me with the drawer part, I went ahead and picked up the tube steel from the steel yard and got to work at ADX.